
Dragon Tower Defense Talents: Costs and Upgrade Priorities
Spend Coins on permanent upgrades for the dragons you use regularly. Compare each dragon's talent options, choose the effect your team needs, and budget for the next level.
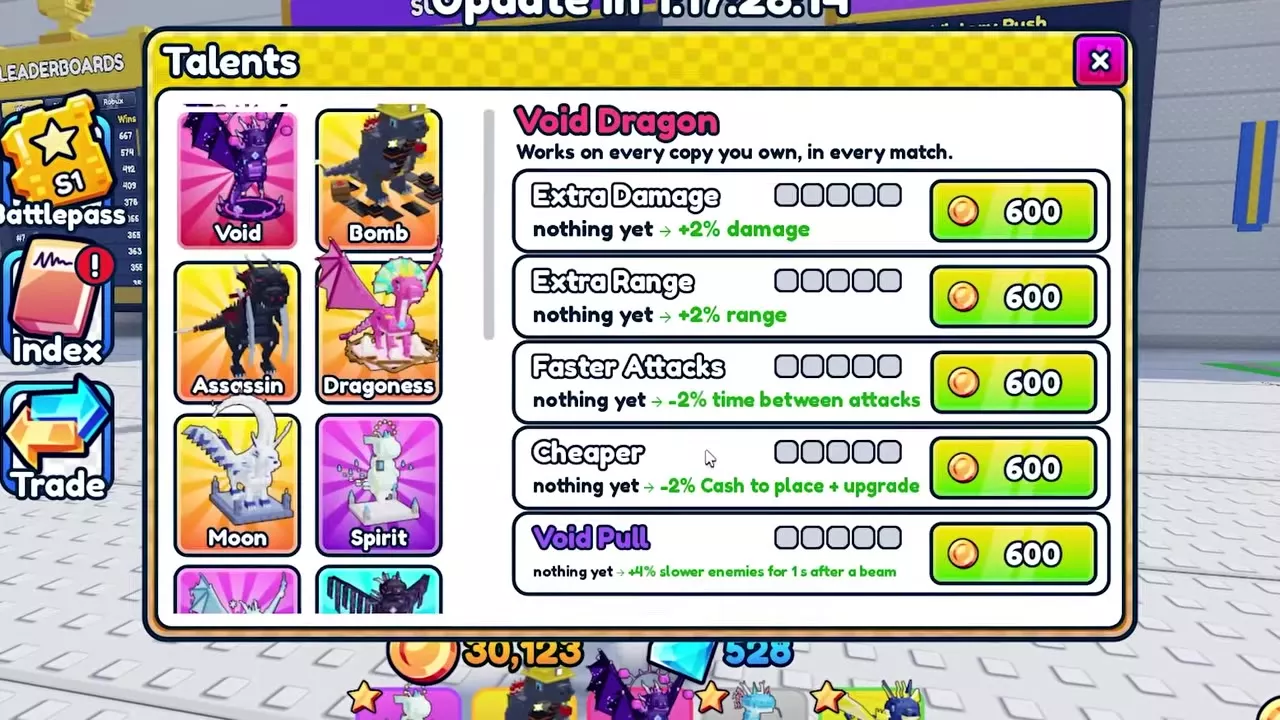
Beat Hard mode, then open Units → Talents. Select a dragon and buy a talent level with Coins; its bonus permanently applies to every copy of that dragon you own in every match. First levels cost 200 Coins for Rock, 300 for Spirit, 400 for Bomb, Assassin, Dragoness or Sun, 600 for Void, and 1,000 for Titan or Prism. Prioritize your regular dragons, then choose damage, coverage, lower Cash costs or their named talent to address your team's current weakness.
Unlock Talents After Hard
Beat Hard mode to unlock Talents. In the lobby, open Units → Talents and select a dragon type from the left-hand list.
A purchased talent permanently strengthens every copy of the selected dragon you own, and its effect applies in every match. Buying a talent for one dragon type does not upgrade your other dragon types.
Talent purchases use Coins. During a match, deployment and battle upgrades use Cash. The Cheaper talent is purchased with Coins and then reduces that dragon's placement and upgrade Cash costs.
Talent Effects and First-Level Costs
The first-level price applies to each individual talent in the selected dragon's tree, rather than unlocking the entire tree.
Void, Bomb, Assassin, Titan, Rock, Sun and Prism have Extra Damage, Extra Range, Faster Attacks, Cheaper and their own named talent. Dragoness and Spirit have Extra Damage, Faster Attacks, Cheaper and their own named talent.
At Level 1, the shared upgrades provide 2% more damage, 2% more range, 2% less time between attacks, or 2% lower placement and upgrade Cash costs, respectively.
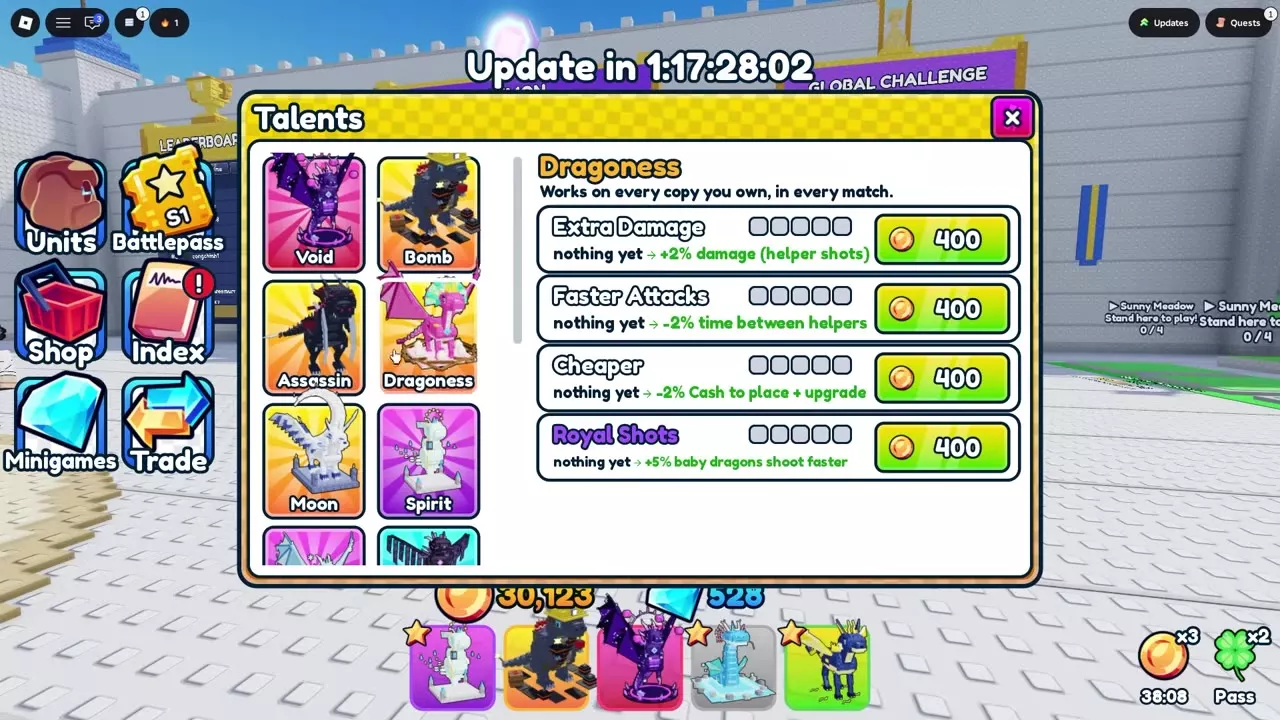
For Dragoness and Spirit, Extra Damage increases helper shooting damage, while Faster Attacks reduces the interval between new helpers. Royal Shots separately improves the shooting speed of Dragoness's baby dragons. Choose between stronger shots, more frequent helper appearances and faster helper shooting according to the effect you need.
9 objects
| Name | First level cost per talent | ||||||||||||||||||||||||||||
|---|---|---|---|---|---|---|---|---|---|---|---|---|---|---|---|---|---|---|---|---|---|---|---|---|---|---|---|---|---|
|
200 Coins
| |||||||||||||||||||||||||||||
| |||||||||||||||||||||||||||||
|
300 Coins
| |||||||||||||||||||||||||||||
| |||||||||||||||||||||||||||||
|
400 Coins
| |||||||||||||||||||||||||||||
| |||||||||||||||||||||||||||||
|
400 Coins
| |||||||||||||||||||||||||||||
| |||||||||||||||||||||||||||||
|
400 Coins
| |||||||||||||||||||||||||||||
| |||||||||||||||||||||||||||||
|
600 Coins
| |||||||||||||||||||||||||||||
| |||||||||||||||||||||||||||||
|
1,000 Coins
| |||||||||||||||||||||||||||||
| |||||||||||||||||||||||||||||
|
1,000 Coins
| |||||||||||||||||||||||||||||
| |||||||||||||||||||||||||||||
|
400 Coins
| |||||||||||||||||||||||||||||
| |||||||||||||||||||||||||||||
4 objects
| Name | Effect | ||||
|---|---|---|---|---|---|
|
Damage
| |||||
| |||||
|
Range
| |||||
| |||||
|
Attack or helper appearance interval
| |||||
| |||||
|
Placement and upgrade Cash costs
| |||||
| |||||
9 objects
| Name | Effect | ||||||
|---|---|---|---|---|---|---|---|
|
Beam-hit slow
| |||||||
| |||||||
|
Road-mine cap
| |||||||
| |||||||
|
Cash from Assassin Dragon kills
| |||||||
| |||||||
|
Baby dragon shooting speed
| |||||||
| |||||||
|
Helper health
| |||||||
| |||||||
|
Explosion and lava pool size
| |||||||
| |||||||
|
Shard attack line width
| |||||||
| |||||||
|
Beam blast area
| |||||||
| |||||||
|
Circular area and sunbeam width
| |||||||
| |||||||
Rock Dragon Talents
- First level cost per talent
- 200 Coins
- First level cost per talent
- 200 Coins (Each listed talent is unupgraded.)
Spirit Dragon Talents
- First level cost per talent
- 300 Coins
- Level slots per talent
- 5 slots
- First level cost per talent
- 300 Coins (Each listed talent is unupgraded.)
Bomb Dragon Talents
- First level cost per talent
- 400 Coins
- Level slots per talent
- 5 slots
- First level cost per talent
- 400 Coins (Each listed talent is unupgraded.)
Assassin Dragon Talents
- First level cost per talent
- 400 Coins
- Level slots per talent
- 5 slots
- First level cost per talent
- 400 Coins (Each listed talent is unupgraded.)
Dragoness Talents
- First level cost per talent
- 400 Coins
- Level slots per talent
- 5 slots
- First level cost per talent
- 400 Coins (Each listed talent is unupgraded.)
Void Dragon Talents
- First level cost per talent
- 600 Coins
- Level slots per talent
- 5 slots
- First level cost per talent
- 600 Coins (Each listed talent is unupgraded.)
Titan Dragon Talents
- First level cost per talent
- 1,000 Coins
- First level cost per talent
- 1,000 Coins (Each listed talent is unupgraded.)
Void Pull
- Effect
- Beam-hit slow
- Additional slow
- 4 %
- Slow duration
- 1 second
- Additional slow
- 4 % (Enemies hit by Void Dragon's beams.)
- Slow duration
- 1 second (Enemies hit by Void Dragon's beams.)
Stockpile
- Effect
- Road-mine cap
- Additional mine capacity
- 1 mine
Bounty
- Effect
- Cash from Assassin Dragon kills
- Kill Cash bonus
- 10 %
- Kill Cash bonus
- 10 % (Assassin Dragon gets the kill.)
Royal Shots
- Effect
- Baby dragon shooting speed
- Shooting speed bonus
- 5 %
- Shooting speed bonus
- 5 % (Dragoness's baby dragons.)
Tough Spirits
- Effect
- Helper health
- Helper health bonus
- 6 %
- Helper health bonus
- 6 % (Spirit Dragon's helpers.)
Big Quake
- Effect
- Explosion and lava pool size
- Fireball explosion size bonus
- 5 %
- Lava pool size bonus
- 5 %
Wide Shards
- Effect
- Shard attack line width
- Shard attack line width bonus
- 5 %
Buy the Next Talent Level
- Open Units → Talents and select the dragon you want to improve.
- Read the chosen talent's current effect and the next effect after the arrow. “nothing yet” means that talent has no purchased levels.
- Check the Coin price on that talent's purchase button. Have enough Coins for that specific next level.
- Press the price button to buy the level. The talent's progress slots fill, and its next-level effect and price update.
Void, Bomb, Assassin, Dragoness, Spirit, Sun and Prism each have five level slots per talent. Read the price again before buying another level: a first-level price does not set the price of later purchases.
Choose Your Next Upgrade
Start with a dragon you bring to repeated matches. Improving a regular defender gives the permanent bonus more opportunities to help, especially when you deploy multiple copies.
Match shared upgrades to the problem
- Extra Damage: Choose it when your direct attacker reaches enemies reliably but needs harder hits. For Dragoness and Spirit, use it to strengthen helper shots.
- Faster Attacks: Choose it for more frequent attacks from Void, Bomb, Assassin, Titan, Rock, Sun or Prism. For Dragoness and Spirit, choose it when you need new helpers to appear more often.
- Extra Range: Choose it when reaching more of the route is the immediate limitation. It is available on Void, Bomb, Assassin, Titan, Rock, Sun and Prism.
- Cheaper: Choose it when placement or upgrade costs delay your build. Its value comes from reducing the Cash you spend developing that dragon during matches.
Choose a named talent for its specific job
- Void — Void Pull: Prioritize it when Void's job is slowing enemies. Level 1 adds 4% slow for one second after a beam hit. Favor Extra Damage or Faster Attacks first when attack output is your immediate need.
- Bomb — Stockpile: Buy it when Bomb reaches its road-mine cap. Level 1 adds capacity for one more mine; that extra capacity helps when your existing limit prevents a larger stockpile.
- Assassin — Bounty: Favor it when Assassin regularly gets kills and you want more battle income. Level 1 increases Cash earned from its kills by 10%. If Assassin needs help securing those kills, improve its damage or attack cadence first.
- Dragoness — Royal Shots: Choose it when you want the baby dragons already shooting to fire faster. Level 1 improves their shooting speed by 5%. Choose Faster Attacks instead when the gap between new helpers is the problem, or Extra Damage for stronger helper shots.
- Spirit — Tough Spirits: Choose it when helpers need more durability. Level 1 adds 6% helper health. When they already survive well enough, helper shot damage or more frequent appearances addresses output more directly.
- Titan — Big Quake: Choose it when wider area coverage matters. Level 1 increases both fireball explosion size and lava pool size by 5%. Use Extra Damage or Faster Attacks when the immediate goal is stronger or more frequent attacks.
- Rock — Wide Shards: Choose it when narrow shard attack lines limit coverage. Level 1 widens those lines by 5%. Compare that coverage benefit with your next damage purchase at its current Coin price.
- Sun — Bright Sun: If Sun can target the group but enemies pass just outside its circular attack or beside its sunbeam, spend 400 Coins on Bright Sun first. Level 1 enlarges the circular attack area and widens the sunbeam by 5%. Choose Extra Range first if the group is too far away to target.
- Prism — Wide Beams: If a beam hits its target but the blast misses nearby enemies, spend 1,000 Coins on Wide Beams first. Level 1 increases the blast area at impact by 5%. Choose Extra Range first if Prism needs to target enemies farther along the path.
Rock's Later Talent Costs
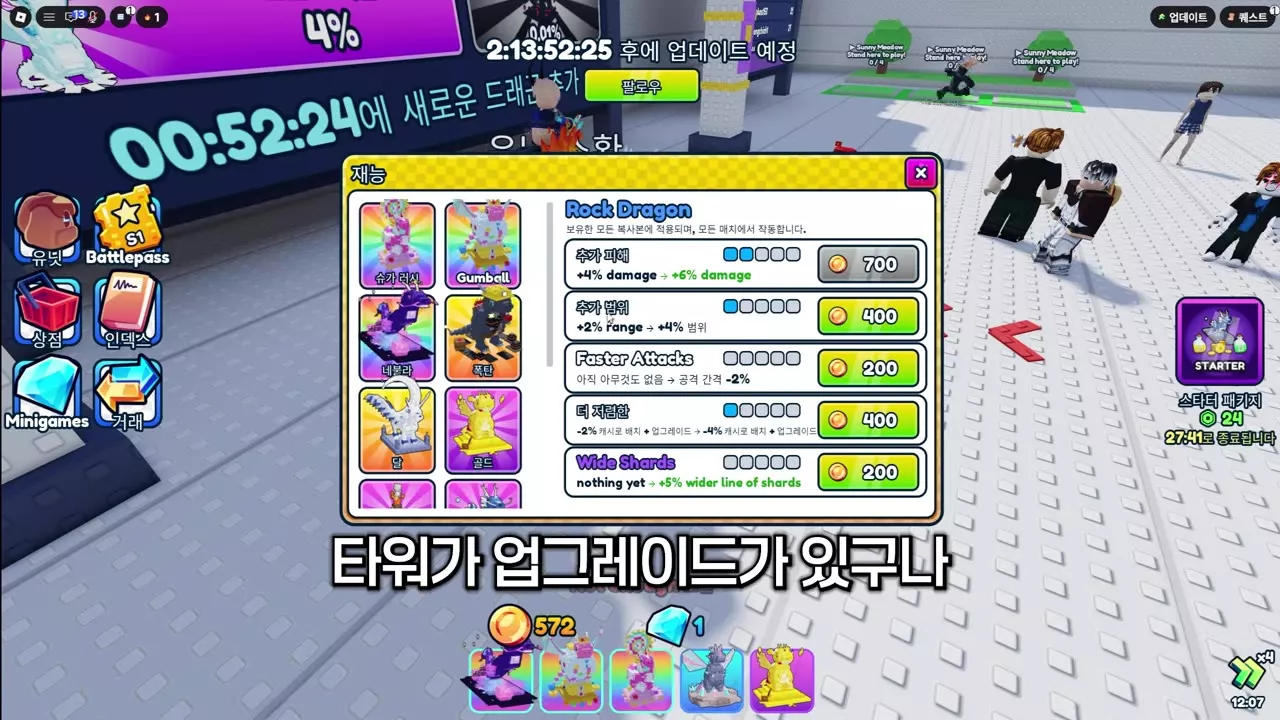
Rock's next-level purchases increase its existing bonuses. Raising Extra Damage from 4% to 6% costs 700 Coins and adds two percentage points to the damage bonus. Raising Extra Range from 2% to 4% costs 400 Coins; raising Cheaper's Cash cost reduction from 2% to 4% also costs 400 Coins.
At that progression point, unupgraded Faster Attacks and Wide Shards still cost 200 Coins each for their first levels. Compare those lower-cost purchases with the problem you need to solve: attack cadence, shard coverage, damage, reach or Cash affordability.
The 700-Coin damage price buys the transition from Level 2 to Level 3. Budget each further purchase from its displayed next-level price rather than multiplying Rock's 200-Coin starting price.
Rock Dragon Talents
- Extra Damage bonus
- 4 %6 %
- Extra Damage level cost
- 700 Coins
- Extra Range bonus
- 2 %4 %
- Extra Range level cost
- 400 Coins
- Cheaper Cash cost reduction
- 2 %4 %
- Cheaper level cost
- 400 Coins
- Extra Damage level cost
- 700 Coins (Purchasing Level 3 from Level 2.)
- Extra Range level cost
- 400 Coins (Purchasing Level 2 from Level 1.)
- Cheaper Cash cost reduction
- 2 % Applies to placement and upgrade Cash costs.
- Cheaper Cash cost reduction
- 4 % Applies to placement and upgrade Cash costs.
- Cheaper level cost
- 400 Coins (Purchasing Level 2 from Level 1.)
Hard Walkthrough and Dragon Growth
- Unlock Talents: Follow the Pirate Cove Hard walkthrough to complete the 40-wave battle.
- Fund your purchases: Use the Coins guide to choose repeatable clears and collect rewards between runs.
- Plan a dragon's development: Open the dragon directory for individual growth stats, acquisition details and dragon-specific advice.