
Dragon Tower Defense Nightmare Guide: Volcano Fortress Teams
Clear Volcano Fortress’s 60 waves by securing early damage, growing income and concentrating upgrades on your main attackers. Choose the Minigunner–Titan build or the Void Berserker core below, then prepare for shields, Phoenix Rebirth and the final Demon Lord wave.
Equip Minigunner Speed III, Titan Rapid Fire, Void Range II, Gumball and Sugar Rush. Open with the $900 Minigunner from your $1,300 starting Cash, keep Auto Skip off, then build Gumball income and save $1,800 for a central Titan. Develop Titan, cover attackers with Sugar Rush and add late damage. This configuration completed wave 60 with 100/100 castle HP. A Void Berserker core supported by Gold, Assassin and Minigunner also achieved a full-health clear.
Choose a Nightmare Route
Choose the route whose dragons and traits you can equip before entering.
| Route | Main damage | Income | Support |
|---|---|---|---|
| Minigunner–Titan | Titan, Void, Minigunner | Gumball | Sugar Rush |
| Void Berserker core | Void, Assassin, Minigunner | Gold | — |
The Minigunner–Titan build uses five slots. Equip Minigunner with Speed III, Titan with Rapid Fire, Void with Range II, Gumball and Sugar Rush. Minigunner handles the opening; Gumball funds Titan’s splash attacks and lava pools; Sugar Rush strengthens nearby attackers; Void adds multi-target beams later. This configuration completed all 60 waves with 100/100 castle HP.
Choose the Void Berserker core if you can support its beam upgrades with Gold income. Develop Void with Berserker, then support it with Gold, Assassin and Minigunner. This route also finished with 100/100 castle HP. Follow its growth priorities in the Void Berserker and Gold section below.
For another five-dragon option, As nodt recommends Void, Moon, Dragoness, Assassin and Sun. It combines multi-target beams, long-range damage, summoned helpers and Sun’s area or line coverage. A simpler community approach pairs Sun and Moon with an income dragon to finance their upgrades.
Entry and Opening Budget
- Equip your chosen team in the lobby.
- Stand on the Volcano Fortress pad marked Nightmare and Stand here to play!
- Use the party panel to start the challenge, then wait for teleportation. Enable Friends Only if you want to restrict the party to friends. Parties support up to four players.
- Inspect the route and place your opening defender during preparation. Press START when ready.
The starting setup gives each player $1,300 Cash, a 100-HP castle and a deployment counter capped at 16. Dollar amounts in the walkthroughs refer to battle Cash; victory rewards use Coins.
Nightmare waves 1–5 were made slightly easier effective November 10, 2026. Keep the same opening priority: establish damage before expanding income.
Open with Minigunner and Build Income
- Place Minigunner Speed III for $900 during preparation. This leaves $400 from the starting budget.
- Turn Auto Skip off while the opening defense develops.
- Add Gumball income after Minigunner is holding the route. Gumball costs $600 to place, so wait for more Cash before adding it.
- Save toward the $1,800 Titan instead of trying to establish every role immediately.
At Level 1, Form 1, this Minigunner Speed III configuration has 2.25 damage per bullet, 22 range, a 0.10-second attack interval and one minigun. Its first evolution costs $750.
An economy-heavy opening lost at wave 8 and failed again after a revive. The successful restart changed to Minigunner first and disabled Auto Skip. If early enemies are getting through, spend on useful damage before adding more income units; extra economy cannot recover a run whose opening defense is already failing.

Develop Titan Before the Middle Bosses
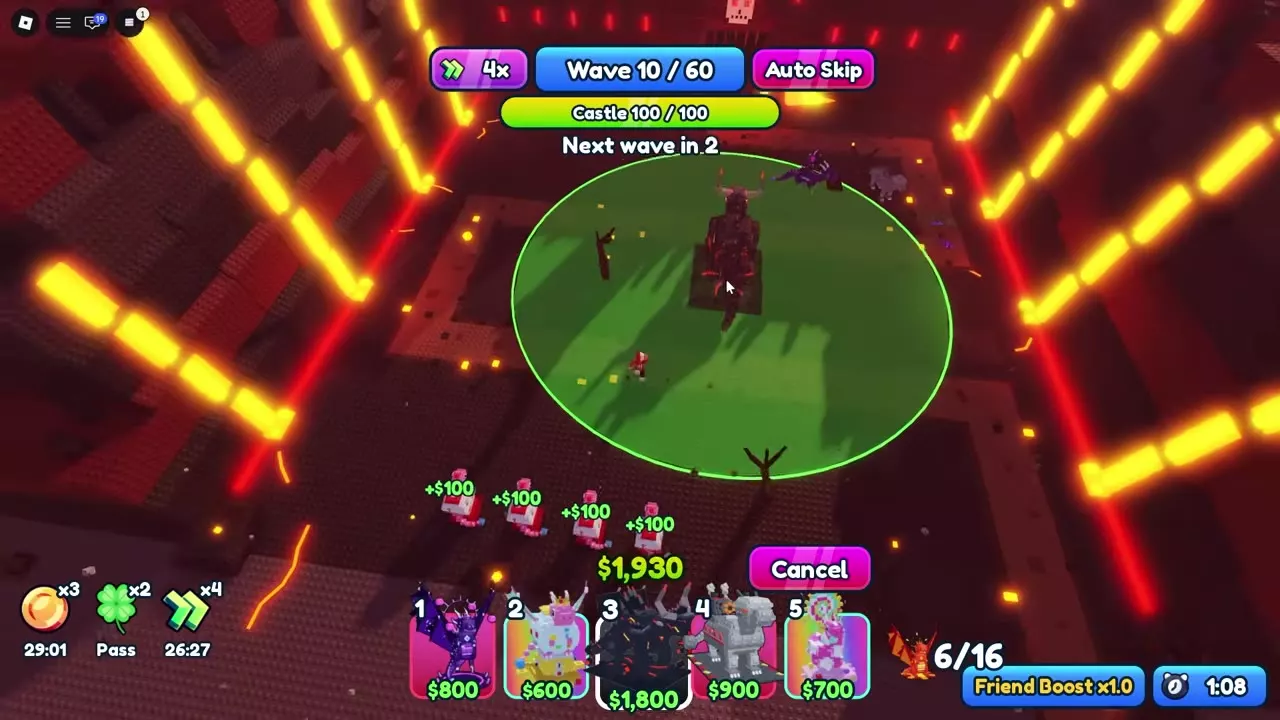
Place Titan near the center around the wave-10 transition, using its placement preview to cover the surrounding route. The $1,800 placement carries the build into its main damage investment.
Use these checkpoints from the full-health Rapid Fire route:
| Checkpoint | Titan target | Next spending |
|---|---|---|
| Around wave 10 | Central placement | $1,800 |
| Wave 16 | Level 3 | Continue upgrades |
| Wave 18 | Level 4 | $2,750 to Level 5 |
| Hellhound encounter | Level 5 | $3,150 to Level 6 |
| Wave 37 | Level 12 · Form 5 | Develop support |
The $3,150 evolution takes Titan from Level 5 to Level 6, Form 3. In this configuration, its damage preview rises from 620.1 to 807.3. Have that purchase in mind as Hellhound arrives at wave 20; the route completes the evolution during wave 21.
Turn Auto Skip back on once the defense is comfortably holding. Continue damaging surviving bosses across wave transitions: the next wave can begin while Hellhound, Magma Titan or Ash Witch is still alive. Keep route coverage active rather than treating a new wave banner as a completed boss fight.
Add Buff Coverage and Late Attackers
Once the first Titan is developed, strengthen the attackers around it rather than scattering purchases across undeveloped units.
- During wave 38, spend $2,300 to raise Sugar Rush from Level 5 to its maximum Level 6.
- Keep your main attackers inside Sugar Rush’s boost area. Select Sugar Rush to inspect its coverage; affected attackers display a candy marker.
- Add a second Titan around wave 39 and develop it. The route reaches Level 7, Form 3 on this Titan by wave 40.
- Finish Minigunner’s $4,700 final upgrade, reaching Level 9, Form 5 by wave 44.
- Develop Void Range II for the later waves and check that the expanded defense still receives useful buff coverage.
After the wave 38 upgrade, this route’s regular Level 6 Sugar Rush has a boost circle of 18. Attackers inside it gain +30% damage, +25% attack speed and +3 range. If you use Shiny Sugar Rush, read its current bonuses on its panel and place your next Titan inside the blue circle.
The late Minigunner Speed III configuration has two miniguns, 20.8 damage per bullet, 35 range and a 0.05-second attack interval. The Level 9, Form 5 Void Range II configuration after the coverage check has eight beams, 319.8 damage per beam, 56.35 range and a 1.36-second attack interval.
With Sugar Rush nearby, the Level 12, Form 5 Titan Rapid Fire configuration has 2,600 damage, 63 range and a 2.52-second attack interval. Its lava pool deals 312 damage per second, lasts three seconds and has radius 10; its splash radius is 14. This gives the build both immediate splash damage and continuing damage on covered sections of the route.

Void Berserker and Gold Route
Use Void with Berserker as the main attacker, fund its growth with Gold and develop Assassin and Minigunner as supporting damage. Void costs $800 to place. Its initial three beams can attack three different enemies, giving it useful coverage against groups.
Establish Void and Assassin
Fund Void’s first $850 evolution, then its $1,200 next upgrade. Develop Assassin alongside the defense before Hellhound. At Assassin Levels 2, 4 and 6, the next evolution offers cost $550, $1,050 and $1,850 respectively; use these as budgeting checkpoints while keeping Void’s main damage growing.
Keep attacking Hellhound if wave 21 starts before it dies. Clear the boss and the ordinary enemies before committing all available Cash to income.
Grow Gold and Continue Void
Upgrade Gold while the defense holds. A Level 4 Gold earns $225 per wave; its $700 upgrade raises that to $300 per wave. At Level 6, Gold earns $400 per wave. The placement limit is four Gold Dragons, so direct further income spending into their upgrades once all four are deployed.
Advance Void through these purchases:
| Current stage | Purchase | Result |
|---|---|---|
| Level 3 · Form 3 | $1,600 upgrade | Four beams |
| Level 4 · Form 3 | $2,100 evolution | Level 5 · Form 4 |
| Level 5 · Form 4 | $2,650 upgrade | Further growth |
| Level 7 · Form 5 | $4,200 upgrade | Seven beams |
At Level 3, Form 3, the Berserker configuration has 78 damage per beam, 36.3 range, a 2.30-second attack interval and three beams. The $1,600 upgrade previews 102 damage per beam, 38.5 range, a 2.20-second interval and four beams. Increasing the beam count expands how many different enemies Void can attack at once.
Aim to have a Void at Level 7, Form 5 by wave 40, matching the full-health route. This stage has six beams, 200.4 damage per beam, 45.1 range and a 1.90-second attack interval. The $4,200 upgrade previews seven beams, 242.4 damage per beam, 47.3 range and a 1.80-second interval.
Add Late Supporting Damage
Continue adding and developing attackers as Gold funds the defense. The route uses a Level 7, Form 4 Assassin on Strongest at wave 51, then a Level 2, Form 2 Minigunner on First at wave 57.
Assassin’s $2,300 final upgrade raises damage from 2,500 to 3,000 and range from 20 to 22, retaining a 12-second attack interval. The supporting Minigunner’s $1,050 evolution previews an increase from 6.5 to 8.5 damage per bullet and from 23 to 24 range. Continue clearing through wave 60; this core achieved a 100/100 castle-health finish.

Boss Waves and Recovery
Keep both boss damage and ordinary-enemy coverage active. Slow to 1x whenever placement, targeting or upgrades need more attention; enemies approaching the castle can also trigger an automatic return to 1x.
Wave 20: Hellhound
Hellhound has 9,000 HP. In the Titan route, prioritize the $3,150 Level 6 evolution around this encounter. Maintain route coverage through TRIPLE BREATH, ON FIRE and PACK CALL prompts, and keep attacking if Hellhound survives into wave 21.
Wave 30: Magma Titan
Magma Titan has 16,000 HP and uses the LAVA SLAM prompt. Keep your developed main attacker covering its path and continue damage if it survives into wave 31. Avoid entering this section with your spending spread across many weak attackers: the Minigunner–Titan route concentrates its investment in the first Titan before expanding late damage.
Wave 40: Ash Witch
Ash Witch has 18,000 HP. Continue attacking through HEX, HEXED and SHADOW CLONES prompts. Switch to 1x while managing upgrades, and keep firing if the boss remains alive after wave 41 begins.
Wave 50: Obsidian Knight
Obsidian Knight has 24,000 HP. During GLASS SHIELD, attacks reduce the separate shield value while the boss’s HP stays unchanged. Keep attacking until the shield is depleted, then continue damaging HP. The shield can activate again during the same fight, so preserve sustained coverage through repeated barriers and the SHATTER STRIKE and STUNNED prompts.
Wave 55: Inferno Phoenix
Inferno Phoenix starts with 26,000 HP. Keep the defense active through FIRE RAIN and BURNED prompts. In the legendary-route encounter, REBIRTH restores it to 13,000/26,000 HP. Continue through that restored health segment before treating the encounter as finished.
Wave 60: Demon Lord and Hellhounds
Clear Demon Lord, the accompanying Hellhounds and every remaining enemy. Multiple Hellhounds have 9,000-HP bars. Demon Lord has 45,000 maximum HP in the legendary-lineup encounter and 67,000 in the two-player encounter. Maintain damage through SECOND PHASE and HELLFIRE SLASH.
If enemies move beyond the useful coverage of your front line:
- Slow to 1x for placement and upgrades.
- Sell attackers that can no longer reach the advancing enemies. Recover both Cash and deployment slots.
- Rebuild beside the remaining route near the castle, then upgrade the replacements immediately. In the legendary route, this means rebuilding Sun and adding Moon.
- If the castle is destroyed, use an available revive. The window offers Watch Ad: Revive, Free Revive (daily) and No. Any player can revive the whole team, restoring the castle and pushing enemies back to the start.
- Continue developing the surviving defense and clear the entire final wave.
The legendary route uses this recovery to finish after a castle revive. For button behavior and targeting options, see combat controls, upgrades and wave settings.


Victory Rewards
A wave-60 Nightmare victory awards 1,200 Coins before bonuses.
| Bonus setup | Total Coins |
|---|---|
| No additional Coin bonus | 1,200 |
| 2x Coins Pass | 2,400 |
| Pass + Coins Potion | 3,600 |
| Pass + potion + purchase example | 6,000 |
The pass adds 1,200 Coins to the base reward. In the Minigunner–Titan clear, the Coins Potion adds another 1,200, bringing the total to 3,600. Buying that run’s 40-Robux Double Rewards offer adds 2,400 more, producing 6,000 Coins. Other victory screens offer Double Rewards for 49 Robux, so use the price and bonus displayed in your settlement menu when deciding whether to buy.
Battlepass XP depends on the reward conditions. The Minigunner–Titan settlement lists +6,000 XP at Tier 30, while the legendary-lineup settlement lists +10,000 XP at Tier 30. The Void Berserker clear lists +600 XP at Tier 8 after the daily limit reduces XP to 10% until the next day.
The legendary-lineup clear also awards one Trait Shard through the Trait Crate reward. The lobby separately displays a 20% purple-item reward preview; that percentage does not identify the one-shard reward as a guaranteed result or a 20% shard drop.
Use Play Again to repeat Volcano Fortress or Lobby to leave. Watch Ad: +200 Coins is an optional settlement offer.

Legendary and Co-op Walkthroughs
- Legendary core: Use Sun and Assassin to establish the opening, then prioritize Moon and Dragoness. This route includes a final-wave rebuild and castle revive; follow the complete Nightmare with Legendary Dragons walkthrough.
- Two-player roles: Let one player supply opening damage with Void while the other develops Gumball income, then convert that economy into late defense. Follow Nightmare Co-op: Defense and Economy Roles for each player’s budget and progression.