
Dragon Tower Defense Void vs Minigunner: Which Should You Use?
Void spreads beam damage across enemies at longer range. Minigunner delivers rapid bullet attacks within a smaller area. Choose around the coverage your defense needs, the Cash available and when you can afford the next evolution.
Choose Void for longer reach and simultaneous attacks on different enemies; choose Minigunner for rapid repeated hits. Void costs 800 Cash to deploy versus Minigunner's 900, but both cost 1,650 Cash in total to reach Level 2. They also work together: open with a Speed III Minigunner in the Nightmare setup, establish income, then develop Void for later multi-target coverage.
Choose by Target Coverage
Both are Mythic dragons, but they solve different defensive problems.
- Choose Void when several enemies need damage at once. Its beams attack different enemies simultaneously, and its longer reach gives you more road coverage from one placement.
- Choose Minigunner when you need frequent hits on enemies passing through a sustained firing area. Place it where its shorter range keeps targets within reach for longer.
- Use both when the loadout allows it. Minigunner can establish the opening while Void becomes a later investment in wider, multi-target coverage.
For a crowded road, Void is the stronger fit for spreading damage. For rapid repeated attacks, favor Minigunner. Placement matters to either choice: an attacker stops contributing once enemies leave its effective range.
Base Stats and Early Investment
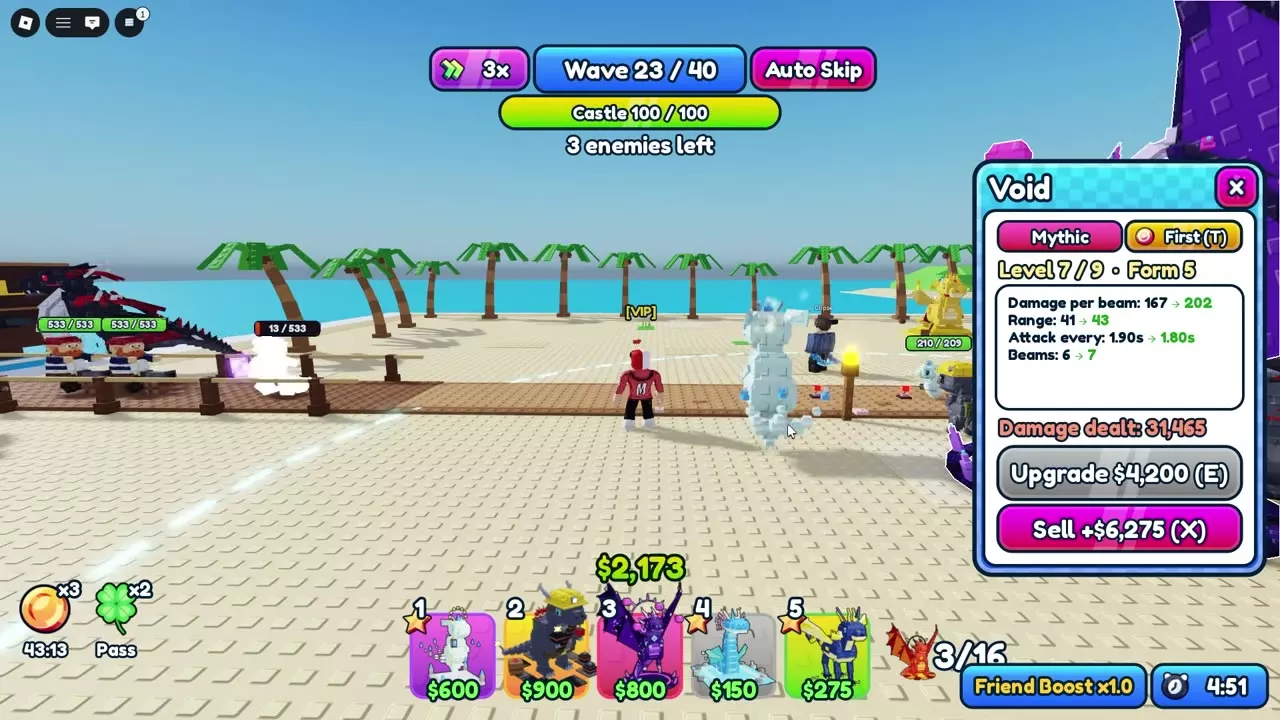
These values exclude trait and support bonuses. Both dragons reach Level 9 and Form 5. Damage is listed per beam for Void and per bullet for Minigunner.
| Attribute | Void Level 1 | Minigunner Level 1 | Void Level 9 | Minigunner Level 9 |
|---|---|---|---|---|
| Damage per beam | 17 | — | 246 | — |
| Damage per bullet | — | 2.25 | — | 16 |
| Range | 30 | 22 | 46 | 32 |
| Attack interval | 2.5 s | 0.12 s | 1.7 s | 0.07 s |
| Beams | 3 | — | 8 | — |
| Miniguns | — | 1 | — | 2 |
Void has the range advantage at both endpoints. Minigunner attacks far more frequently, while Void delivers heavier individual beams across separate targets. Compare those attack patterns alongside the damage values.
All costs below use battle Cash. Total investment includes deployment and the evolutions needed to reach that level.
| Investment | Void | Minigunner |
|---|---|---|
| Deployment | 800 Cash | 900 Cash |
| Level 1 → 2 evolution | 850 Cash | 750 Cash |
| Total at Level 2 | 1,650 Cash | 1,650 Cash |
| Level 2 → 3 evolution | 1,200 Cash | 1,050 Cash |
| Total at Level 3 | 2,850 Cash | 2,700 Cash |
Void leaves 100 more Cash available immediately after deployment. That initial saving disappears at Level 2 because its first evolution costs 100 more. Minigunner then reaches Level 3 for 150 less total Cash, making its next early investment easier to fund.
Beams, Bullets and Evolution
Void: invest in simultaneous coverage
Void starts with three beams and reaches eight at Level 9. With enough enemies in range, those beams can attack different enemies at the same time. Eight beams describe coverage across eight targets; they do not mean eight guaranteed hits on one boss.
A useful growth milestone is the 3,350-Cash evolution from Level 6 to Level 7. It raises the beam count from five to six and changes Void to Form 5. The final Level 8-to-9 upgrade costs 5,250 Cash and raises the count from seven to eight. These investments become especially useful when multiple enemies remain within Void's reach.
Minigunner: read the full evolution preview
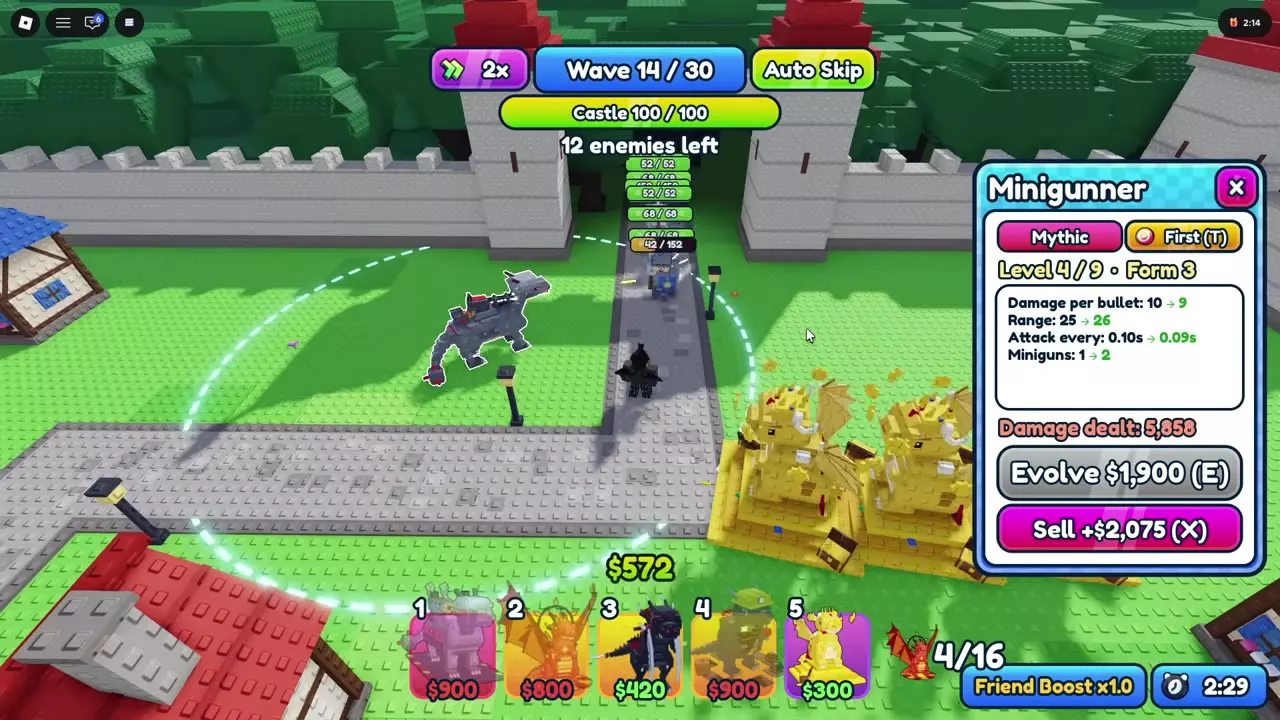
Select a Level 4 Minigunner and spend 1,900 Cash on Evolve to reach Level 5 and gain its second minigun.
| Attribute | Level 4 | Level 5 |
|---|---|---|
| Damage per bullet | 10 | 9 |
| Range | 25 | 26 |
| Attack interval | 0.10 s | 0.09 s |
| Miniguns | 1 | 2 |
The lower bullet damage is part of an evolution that adds a second minigun, extends range and shortens the interval. Judge the whole configuration rather than treating the drop from 10 to 9 as a downgrade by itself.
For a simple repeated attack, divide damage by its interval in seconds. Keep the result tied to the attack label: a per-beam calculation describes one beam. For Minigunner, keep bullet damage, interval and minigun count distinct; do not add another barrel multiplier to a bullet-rate calculation and label it total DPS.
Use Both in Nightmare
The Minigunner-led Nightmare team uses Minigunner, Void, Titan, Gumball and Sugar Rush, with Speed III on Minigunner, Range II on Void and Rapid Fire on Titan. Assign the two Mythics different jobs as the defense develops:
- Open with the 900-Cash Speed III Minigunner and turn Auto Skip off. Its Level 1 attack interval is 0.10 seconds. Establish damage before investing heavily in income; an economy-heavy opening failed before this restart.
- Add Gumball income, then save for the 1,800-Cash Titan. Let the opening attacker hold the road while you fund the larger damage investment.
- Add Sugar Rush support and develop Void for later multi-target coverage. Place the attackers where they can reach the road and receive the intended support buffs.
The developed units have separate trait and buff conditions:
- Level 9 Void with Range II and Sugar Rush: 319.8 damage per beam, eight beams, 56.35 range and a 1.36-second interval.
- Level 9 Minigunner with Speed III and additional combat buffs: 20.8 damage per bullet, two miniguns, 35 range and a 0.05-second interval.
For that boosted Minigunner, 20.8 ÷ 0.05 = 416 damage per second for the single-bullet calculation, or about 400. These configurations illustrate their developed team roles; their different traits and buffs do not provide an equal-configuration damage comparison.

Growth Tables and Nightmare Route
- Open Void Dragon or Minigunner Dragon for their growth tables and individual tips.
- Browse the dragon directory to compare other team roles and acquisition routes.
- Read damage, attack intervals and DPS for calculations involving multiple targets, splash and persistent effects.
- Follow the Volcano Fortress Nightmare guide for the complete opening, upgrade priorities, boss waves and recovery steps.