
Dragon Tower Defense Placement Guide
Good placement keeps enemies under fire for more of the route and puts support dragons close enough to strengthen your attackers.
Place attackers near bends or alongside the road to maximize useful coverage. Align directional attacks with the path, check that Sugar Rush reaches its intended allies, and reserve Cash for a second firing position farther back.
Cover the Route and the Intended Allies
Look for bends or spots between nearby sections of road where an attacker can reach enemies along more than one stretch. For a line attack, favor a straight section that the attack can follow. For support, position the dragon so its area includes the attackers you want to strengthen.
Cash, Space and Placement Preview
- Select a dragon from the bottom hotbar to open its placement preview.
- For ordinary grass placement, move the preview onto grass beside the route, leaving space between the dragon and the road. Inspect the displayed area; the preview can change between red and green as you move it.
- Place the dragon where its coverage is useful, then select the deployed unit to inspect its attack area. Choose Cancel to leave the preview without placing it.
Keep enough battle Cash for the displayed deployment price, and leave room under both the overall deployment limit and any limit specific to that dragon. A preview alone does not spend Cash or establish a defender.
Place Boulder Dragon directly on the road. Ordinary enemies stop and attack it until it breaks; bosses break through and continue moving while dazed.
If Too close to the road appears, move farther from the road. If Too close to another dragon appears, move farther from the nearby unit and try another position. If Not enough cash appears, wait until you have the deployment price; you can still enter the preview while short on Cash.
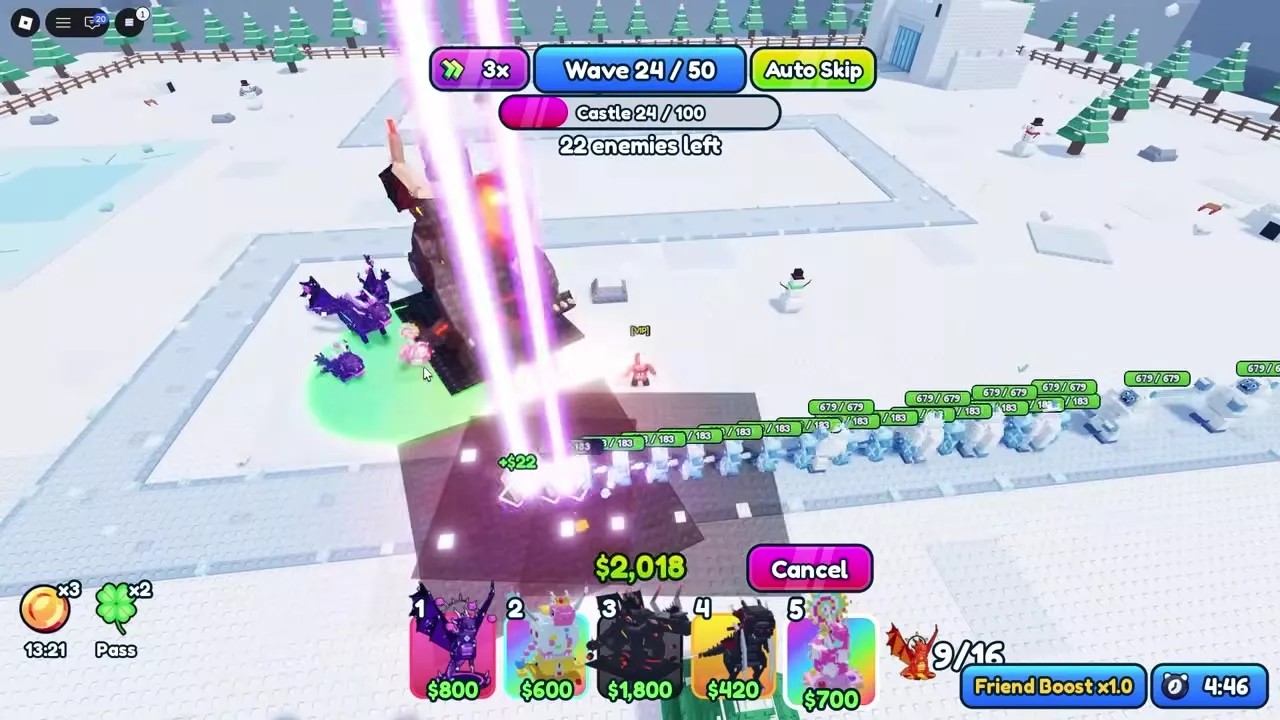
Place Line and Directional Attackers
- Place Rock beside a straight section so its line of erupting crystals follows the road. This gives the attack more useful path to cover than a line aimed across a narrow section.
- Recheck Sun after it reaches Level 3 and gains its line attack. Select it and compare the displayed line with the route your enemies follow.
- Select a deployed Hydra and inspect both its circular range and the rectangular beam area extending from one side. Choose a position where that rectangle covers the road; the circle alone does not show the beam's direction.
A Level 1 Hydra costs 1,250 Cash to deploy and sells for 625 Cash. Selling it and deploying a replacement therefore costs a net 625 Cash, so consider the beam's position before committing.

Cover Attackers with Sugar Rush
Place Sugar Rush near the attackers you want to support, then select it to display its blue Boost circle. Check the attackers' positions against the circle and look for the candy marker on affected units.
Keep important attackers comfortably within reach when space allows. In a two-Storm setup, one Storm received a candy marker while the other near the edge did not, making the placement less useful for the pair.
Sugar Rush costs 700 Cash to deploy. Regular Sugar Rush's Boost circle grows from 12 at Level 1 to 18 at Level 6, so judge the final coverage against the positions of the attackers you intend to buff. At Level 6, the boost provides +30% damage, +25% attack speed and +3 range.

Build a Second Firing Position
Watch what happens after enemies leave your front line's range. Reserve enough Cash and deployment space for an inexpensive attacker farther along the road, so it can keep firing at enemies that get through.
In a Castle Town opening, spending the available Cash on upgrades left too little to add Cloud immediately when rear coverage was needed. Balance upgrades against the cost of your planned backup.
During a final wave, once enemies have passed the useful reach of your front units, sell those units and rebuild near the remaining stretch of road. Make sure the replacement is actually deployed: a placement preview by itself cannot attack.
Combat Controls and Map Routes
Use the combat controls guide for target priorities, selling and other battle actions. For complete routes, see the Castle Town Normal walkthrough or the Nightmare Legendary route. Browse the dragon directory to compare units for your defense.